

Shabby Chic Ruffled Diaper Cake
Sometimes I dream up something, have these great ideas, but then when I attempt them, well....lets just say they do not quite turn out the way I envisioned. Yet somehow this project turned out exactly how I envisioned it, and I am in love!
Several,years ago I made my first diaper cake, which you can see Here . I was looking at changing the normal diaper cake and make it a little more elegant. This time I had an opportunity to make another one for a family member-in fact I am giving her a baby shower, and I am so excited! I will have to share pictures afterwards. :)
So I wanted to make this unique, sweet, and shabby chic loving ruffles. But how? If I used fabric that would be expensive, and I am all about being thrifty. In fact aside from the diapers I bought for this, it only cost $2 for the rest!!! Yes, you read that right, because in the end, I bought diapers and 2 plastic table cloths, 1 white, and 1 pink, both only 97 cents each, and I didn't even use them completely.
Plastic table cloths? Yes ma'am! Pull your table cloth out of its plastic cover, do not unfold-now cut it in maybe 2 inch wide strips, I found as I was going towards the top of the cake I needed smaller strips, so I used about a 1 inch wide strip-so do both. Now, How did I make it ruff-lee? (Not a word but i like it) Well, that was the fun part, it took me a bit of practice not to pull too hard or it tears, but if you pull with both your thumbs and index fingers close together, you get this cute ruffle as you go along, like this:

Pretty cool right?
Now you need to put your diapers together. Last time I rolled them all up, but this time I decided I wanted more of a smooth edge, so the outside layer I laid out flat, inside I rolled. Securing with large rubber bands I still had left over from the last one.
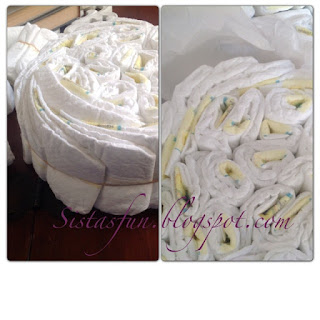
I had to decide how to cover the diapers without ruining them, I mean you want the mother to use the diapers later (although I am really torn now that it's done, can't imagine taking it apart, too cute!) so in the end I decided to cover them again with white tissue paper like I did with the first cake I made. I just used one layer and tucked it underneath inside the diapers. Then began the 2nd layer of the cake,
made it like the first one only smaller:

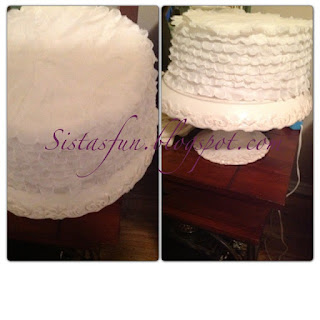
After I covered that top layer with tissue paper I heated up the hot glue gun to begin my ruffled layers. I was torn on what to use to glue the plastic on, but in the end decided the best option I had was the hot glue gun, but I made sure I used the "low heat" one I have, the other one would of melted the plastic and tissue for sure. Just make sure you do not touch the plastic or tissue directly with the metal nozzle of the glue gun, or you will melt them.
I started with the bottom layer, and worked my way up:

For the top I cut out some more table cloth in a circle to cover top, than made it ruffled around the edges, glued it on. I than did the same to the top layer.
The pink ruffled flower was simple, I cut a strip of the pink table cloth, ruffled it, than I used my sewing machine to gather it more as a ruffle, but you could skip this step and just gather it as you go. I then cut a round piece out of some recycled cardboard, and began glueing the ruffle in a circle till I got to the middle. I didn't remember to take pictures of this step, sorry, but it's self explanatory. :)
Now sit back and enjoy your work!

Enjoy creating ~V
No comments:
Post a Comment