Valentine Fairy


I am trying to do some things in my home to make it be more peaceful. I decided that we are going to have a Valentine fairy visit our home during the month of Feb. She will bring these bags leaving a note telling the kids that she is watching them. She will be flying by all through the month and some times will be leaving gifts, letters, leaving them notes of things they must do for the next time she visits, etc. She is going to make sure we are all getting along. I cant wait to see if this works. Its always fun to wake up to little surprises though so I hope this is something they will remember !!

Shannon

Satin Flowers


I decided to give the satin flowers a try. They are super easy. Of course I did not follow a pattern. I just call sizes of un even circles and then you just burn the edges so they dont fray. I then held them together and sitched them together. I glued on a rhinestone and put a slip on the back !!
Super easy and Both me and Addie can wear them !!!


Shannon

Thrifty lamp


Gorgeous mid-century modern lamp base found at Goodwill for $6. This is the kind of thing you would find at Target for $19 or so, but it would be a Chinese-made aluminum or plastic reproduction. This one is stainless steel, very sturdy and high quality, probably from the 1960s. I guess that date because the cord is the old-fashioned kind; the plug has two prongs that are the same size instead of one bigger than the other.

The glass bulb cost me $7 at Ace Hardware, so overall I spent $13 for this new beauty by my bedside. I love its sophisticated shape and its diffuse, calming light - so perfect for winding down at bedtime!

Ana Montana

Elegant Diaper Cake


I do not have a full picture tutorial for this project since I did it awhile ago, but I thought I would share it anyway for whoever would like to try it out for the next baby shower. :)

Things you will need:
1. Two packages of size 1 diapers.
2. One 2 liter size of soda or pop or coke or whatever you might call it.:p
3. Large size tissue paper. Craft stores or $1 stores sell the larger size-any color will do depending on what look your after?
4. Different size rubber bands-need small medium and large ones to go over the layers. Found mine at an Office Supply store.
5. Ribbon. I used large Satin White Ribbon for the sides to cover the rubberband and make them look more elegant, and I used a smaller green satin ribbon for trim.
6. Clear stickers-or other type of decoration.
7. Feathers or flowers for the top of the cake. Optional-you could use anything you would like on top-even just ribbon. In this one I used fun black feathers, and the ribbon.
8. A platter (I used a plastic one I found at a party store for $1-I'm cheap) or tray or big plate or cardboard for the bottom.

-------------------

Put 2 liter bottle in middle of your plate. Take each diaper individually and roll them up and place a sm/med size rubber band around them to secure them. Do this to the whole 1st package. After you have wrapped the diapers, start with the bottom layer and place them upright around the Bottle using a large rubberband that you have put over the bottle. The rubberband will help keep all the diapers secured against the bottle.

To make the bottom layer bigger you will have to but three layers of diapers around the bottle.

After you have put all your layers on. Take two to three sheets of tissue paper and cut a few slits in the middle and slip it over the bottle all the way down to the first layer of diapers-then secure another large rubberband around the tissue. Smooth it around the diapers and tuck it underneath them. Tuck in the tissue around the bottle too to make a smooth clean look.


Now start your 2nd layer carefully around the bottle. This will be two layers of diapers thick. Again finish with the tissue paper cutting a slit in the middle-this one will be smaller than your first one since it doesn't have to slide down the bottle that far. Tucking it in like you did the first layer.

Finish your last layer which will only be one layer thick. This layer should be at the top of your bottle so the top will be a semi flat area. Do not cut the tissue paper for this layer, just cover over all of the top layer of diapers and bottle lid. (You may have to cut some of the tissue ends so you can easily tuck it under- so it's not so bulky)


It will not look perfect, but now is the time to smooth it all out the best you can. You now cover up the sides with the white satin ribbon or whatever color you chose to match your tissue paper. Use double sided tape to secure it.

Now you can add the ribbon (I just tied it in back but you could do the double sided tape again) and stickers and any other embellishments you would like.


Be creative and have fun!!


Photobucket

Tissue paper flower balls


I know these have been around forever, and most know how to make them, but they are coming back in full force, and some would love to learn how. So, I took some pictures along the way and wanted to share these fluffy fun fantastic ummm....ran out of words, but they are just cute and easy and I am surrounded by a ton since I am making them for my daughters shower and wedding. :) Here we go!

Supplies you will need:
Tissue paper
Scissors
String or wire


First you want tissue paper, you can find it in craft stores or just buy ones at the local store where you buy the gift bags, but if your making a ton like me, it's cheaper buying the bulk ones at a craft or dollar store.


Step 1- Now your going to pull it out and cut it into 1/4ths unless you want one big gigantic ball? (If so do not cut it at all-skip this part and proceed to step 2) Take all sheets and fold the tissue paper in half, pull back and cut straight down the line you just made. Now you have two halfs. Take each half and fold in half again, pull back and cut your new line in the middle. Do it to both halves. Now you should have 4 seperate tissue groups-each with at least 8 layers of tissue paper. (most tissue paper comes in layers of 9 tissue papers, you can use all nine together but 6-8 is sufficent for fluffiness fun!)

Step 2- Now your going to start folding them back and forth like an accordian style. Most people only fold them in an inch size, but you can fold them over in wider sections, it's up to you, just not too wide or you will have issues with the other steps.

Keep folding until you have reached the other end, and hold together for step 3.


Step3- Bend the piece in half to find your center point.
Then tie a string, wire or ribbon in the middle. Tie it snug but be carefull not to tear the tissue up.


Step 4- Now your going to cut your edges on each side. You can cut them to a point, or give it a rounded edge like I did with this one.

Step 5- Fan out the accordians on both sides.


Step 6- Start peeling back one layer at a time towards the center-(Warning! Tissue paper is thin and tears easy, this is the step that you have to take the most care with in order to have a fun fluffy ball) do two to three layers on both sides first.


Now turn your tissue upside down and start pulling the other layers towards their center now. This will insure you have a round ball- (otherwise you will have a fluffy flower which is pretty too, and can be used for all sorts of decorating like on your little girls walls or put in a flower pot on your table or so much more) you can now pull the tissue all around the ball to fluff it out more and get your desired look.

Another trick is to leave a long string on when you do the center part so you will have string to hang them up with, or string several together to make a fun garland.

Enjoy all the fluffy goodness! :P


Photobucket

Decorate with Glass


Something simple and inexpensive is old glass serving trays grandma used to use. You can find them in your local thrift store for usually 50 cents to a $1. They can be used for any kind of decorating you can think of. Here are a few ideas for you:

1. Use them for on your dresser with your jewelry.

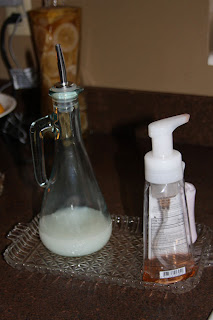
2. Use them by your sinks for your soaps, lotions, cotton balls (one below holding the cotton was an old candy dish I found for 50 cents!) or any other decor.


Speaking of glass containers-something fun is buying a salad/oil dressing dispenser and putting your dish soap in it. It works perfect for pouring out just the right amount, and looks better than just have the store bought bottle on your counter. :) Add tulle, and or ribbon to it too if you want, just be creative. Pick some up and show me what you did with them!


Above all-HAVE FUN!!

Photobucket

{Book Review} "The Maze Runner" & "The Scorch Trials"


James Dashner the author of The 13th Reality wrote these two books and the third to this trilogy "The Death Cure" will be released sometime this fall. There is also "talk" of a movie in the works.
---------------

The Maze Runner-Book Synopsis:
When Thomas wakes up in the lift, the only thing he can remember is his first name. His memory is blank. But he's not alone. When the lift's doors open, Thomas finds himself surrounded by kids who welcome him to the Glade-a large, open expanse surrounded by stone walls.

Just like Thomas, the Gladers don't know why or how they got to the Glade. All they know is that every morning the stone doors to the maze that surrounds them have opened. Every night they've closed tight. And every 30 days a new boy has been delivered in the lift.

Thomas was expected. But the next day, a girl is sent up-the first girl to ever arrive in the Glade. And more surprising yet is the message she delivers.

Thomas might be more important than he could ever guess. If only he could unlock the dark secrets buried within his mind.

The Scorch Trial-Book Synopsis:
Solving the Maze was supposed to be the end. No more puzzles. No more variables. And no more running. Thomas was sure that escape meant he and the Gladers would get their lives back. But no one really knew what sort of life they were going back to.

In the Maze, life was easy. They had food, and shelter, and safety . . . until Teresa triggered the end. In the world outside the Maze, however, the end was triggered long ago.

Burned by sun flares and baked by a new, brutal climate, the earth is a wasteland. Government has disintegrated—and with it, order—and now Cranks, people covered in festering wounds and driven to murderous insanity by the infectious disease known as the Flare, roam the crumbling cities hunting for their next victim . . . and meal.

The Gladers are far from finished with running. Instead of freedom, they find themselves faced with another trial. They must cross the Scorch, the most burned-out section of the world, and arrive at a safe haven in two weeks. And WICKED has made sure to adjust the variables and stack the odds against them.

Thomas can only wonder—does he hold the secret of freedom somewhere in his mind? Or will he forever be at the mercy of WICKED?

----------------------------------

I read these books after the first Hunger Games book, and my first thought was that they were somewhat similar, but they are also very different than each other, and this series is worth picking up imo. I was even able to get my son hooked on them, now he is begging for the third. :) My son also read the HG's and liked that series too.

This series has a lot of twist and turns, but it kept me wanting to know more, I still do and cannot wait for the third book! I have issues with knowing where a book or movie is going from the beginning, too many are predictable-and this turns me off to them, but this series kept me guessing and I love that!

The series is for Teens and Adults, has some violence and made up swear words which were a bit irritating, but overall a clean read.

4 stars


Photobucket

Look Ma, No Sugar! Pumpkin Muffins

Well, ladies, as you know, I am cutting out sugar from my diet for a while. I found a recipe for agave-sweetened pumpkin muffins online and made some modifications. They turned out fantastic and I thought I would share with you all!

Agave-Molasses Pumpkin Muffins
3 cups finely ground whole wheat flour
1 tablespoon baking powder
2 teaspoons baking soda
1/2 teaspoon salt
1 tablespoon ground cinnamon
1 teaspoon ground ginger
1/2 teaspoon ground nutmeg
1/4 cup butter
1/4 cup olive oil
3/4 cup agave
3/4 cup molasses
2 eggs
1 can (15 ounces) pumpkin puree
2 tablespoons water

In large bowl, combine flour, baking powder, baking soda, salt, cinnamon, ginger and nutmeg; set aside. Melt butter in large saucepan; cool. Whisk agave, molasses, egg, water, and pumpkin into the butter. Gradually add to flour mixture, mixing until just blended. Spoon into 24 greased or paper-lined 2-1/2 inch muffin cups. Bake at 350°F for 25 to 30 minutes, or until toothpick inserted in center comes out clean. Remove muffins from pan to wire rack. Serve warm or at room temperature.

Enjoy!

Ana Montana

flower clips

we had some extra time today and i made flower clips with mak and becka. we took three flowers, separated them, and made three flower clips with each color - easily match-able. these flowers took NO time at all. i made 3 clippies in less than 15 minutes. easy-peasy!


i had my lovely assistant model the one with a green button in the middle. the other two have a bumble bee and a butterfly. i think we may have to make more. hmmmm ... have i created a monster? or an obsession?

My latest Projects

I am going to post with pictures just all the random projects I have been working on...Its been fun to get back into the swing of things !!
The Valentines one is just Addies valentines that she will hand out to preschool...Cute containers and we put a silly band in them !
Then there is the Snowman I started in October...He turned out super cute.
Magnet board...My sister had extra bead board so we turned them into magnet boards...I think it turned out super cute.
I then made my sisters new baby a bracelet for her blessing...simple and cute...
Then my ladder....My dad has a wood shop so he helped me whip this up...It is so fun to decorate each Holiday !!
Nothing fancy just my odds and ends that I got finished !

Shannon


Necklace Holder


I made a really simple necklace holder.


It's a picture frame with scrapbook paper for a background. The good thing with this is you can change out your design in the background to something else. You can even use a fabric that matches your decor. The knobs are draw pulls glued on with E-6000.


One thing I suggest: do not glue your knobs on and then put the frame on a high shelf so nobody bumps it. Your knobs might slide around like one of mine did.
~Laura

new FHE chart

i put together a new FHE chart for our family. i wanted something that wasn't the norm ... and i think i got it. i LOVE it!


~ jannet

just had to say

that i am totally enjoying seeing the projects thus far!! ana - i LOVE the cupcakes and the tomato cage trees. and laura - you are quite the talented lady to refinish a trash can. it looks so so good!

Refinishing A Trash Can Cover

This has been a project that has taken me some time. Not that it's hard, but I didn't have the motivation to finish it.


I started back in the summer months. And just finished it New Years Eve.


My parents bought this for me 9 years ago. It's made out of oak. It's been very sturdy through the last 9 years and 4 moves to 3 states. It's taken a beating. So I took it all apart and sanded it all down, used a sprayed primer (which I decided I really don't like to use cause it's gritty and you have to sand it down) then it sat and sat in my basement.


Since I didn't work for the week and a half the kiddos were out of school for Christmas, I decided to finish this baby!


So I took out a can of black paint and started painting. One quick lesson I learned......use tinted primer!! It took quite a few coats to cover the primer with black. Then I got the bright idea to lacquer it. This cover get all sorts of stuff stuck to it so I wanted to be able to clean it off easily. But lacquer in a basement equal all sorts of fumes! But I knew I couldn't take it outside with the snow and wind. Another lesson I learned...no project in the winter if they involve lacquer.


Now the hard part for me was the label of "TRASH". I do not own anything that cuts vinyl. And I didn't want to pay anyone to make me one. So I printed out the word in a font I liked, rubbed the back of the paper with chalk, dusted off the excess and laid it down on the lid and traced the letters. So it was a white carbon copy if that makes sense. I used a paint pen to fill in the letters. IOnce dry I wiped off the chalk marks and Modged Podged over the words, bought new hardware, reassembled it and put it in the kitchen, just in time for our New Years Eve Party!


That's it! And it's already needing to be taken out!


(the black on the refrigderator is NOT from the trash can, that's from moving it 4 times)

Laura

Related Posts Plugin for WordPress, Blogger...