
yet again, this is a really long post. i can't help it!!
anyhow, start with two coordinating patterned fabrics and two coordinating solid fabrics. you will use one pattern for the outside of the tote and the handles (fabric a). another pattern will be used for the pockets (fabric b). one solid will be used for the lining of the tote (fabric c). the remaining solid will be used for the bottom of the outside fabric (it gives it more stability). you will also need interfacing - it will be used with the lining of the tote and the lining of the bottom fabric.
the measurements you will need for the fabric are:
- fabric a: 1 piece - 14" x 28" (outside fabric) and two pieces - 4" x 14" (handles)
- fabric b: 2 pieces - 5" x 11" (pockets)
- fabric c: 1 piece - 14" x 28" (lining fabric)
- fabric d: 1 piece - 14" x 10" (bottom lining fabric)
- interfacing: 1 piece - 14" x 28" and 1 piece - 14" x 10"

iron all fabrics. iron the small piece of interfacing to fabric d (if there is a wrong side, iron the interfacing to that side).

this is how the fabric will look when ironing the interfacing onto fabric d.

(i forgot to take a picture of this next step - sorry!) iron the large pice of interfacing to the wrong side of fabric c (the lining of the tote).
iron both pieces of fabric a - for the handles. iron them in half, wrong sides together.

open up the halfed fabric and fold both sides in towards the ironed fold. iron again.

fold the fabric in half and iron closed. (there will be no raw edges showing)

sew one side of the handle 1/8" away from the edge with a coordinating thread.

sew the other side also - again, 1/8" away from the edge.

take the pieces designated for the pockets - fabric b. one pocket will be on the outside of the tote and one will be on the inside. find the top of the pocket and fold over once - 1/4". press, if necessary.

fold the top over 1/4" again - so there is no raw edge.

press. then sew two seams along the folded edge - one at the top of the pocket and one across the bottom of the folded edge.

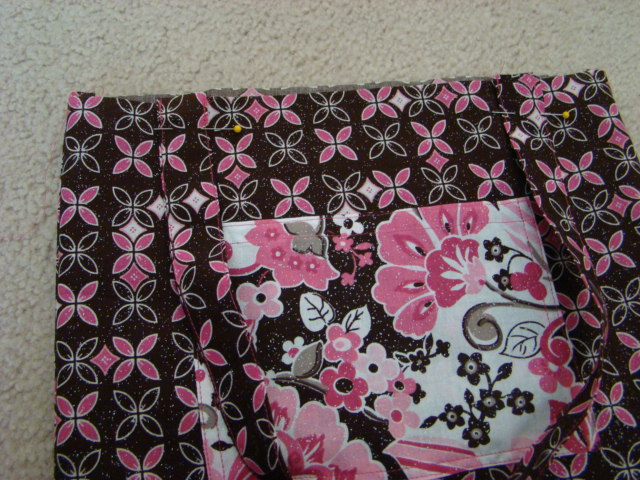
fold all edges in around the pocket - the sides and the bottom - 1/4". the corners are a bit tricky - i fold the corners in so they make a nice, pretty edge. this way, when you sew the pockets on, you won't have any fabric jutting out of the bottom. see how i folded the corners like so?

here is a close-up of the corners.

pin the pockets to the fabric - i always make sure the pockets are at least 2 1/2 to 3" lower than the top edge of the fabric.

make sure the pockets have a bit of give so that they can hold things comfortably.

sew pockets to the fabric. make sure you don't sew the top closed!! (ask me how i know, thankyouverymuch!) i sew once around the pocket 1/8" from the edge. and then sew again 1/4" from the edge. it seems to hold the pocket on better.
this is the first seam.

this is the second seam.

take fabric d (the bottom lining - the one that you ironed the interfacing onto) and fold both long edges (the 14" ones) down 1/4". press and pin.

pin onto the outside fabric (fabric a) along the middle of the fabric. this will form the bottom of the tote.

before sewing anything, make sure the edges of fabric d match up on both sides of the tote. as shown below.

(you can see the edge lined up at the top of the picture - it will be a long piece of fabric with a pocket on it - and a smaller piece of fabric in the middle.

sew fabric d onto fabric a. try and sew the fabric as close to the edge of fabric d as possible. sew both edges onto the fabric.

all pieces will be like this now - two handles sewn on both edges. one outer fabric with a pocket and a bottom lining. one inner lining with the interfacing ironed onto the outside of it.

fold the large pieces of fabric (fabric a and fabric c) in half. pin. if there is interfacing hanging off the edges, or the edges of fabric a and fabric d don't line up, trim them up.

make sure that the edges of fabric d line up when pinning the edges of fabric a.

don't turn the fabrics right side out yet. this is a tricky part. pinch the bottoms together so they form a triangle. mark off 4" across the triangle. (this will be the width of the tote along the bottom - if you want it wider, increase the length you mark off)

sew across the marked portion of the corners.

cut off the corner portion (make sure you cut about 1/4" away from the seam).

turn fabric a right side out. take the handles and pin to the top edges of the tote -

pin both handles on opposite sides of the tote - make sure that they are free of twists.
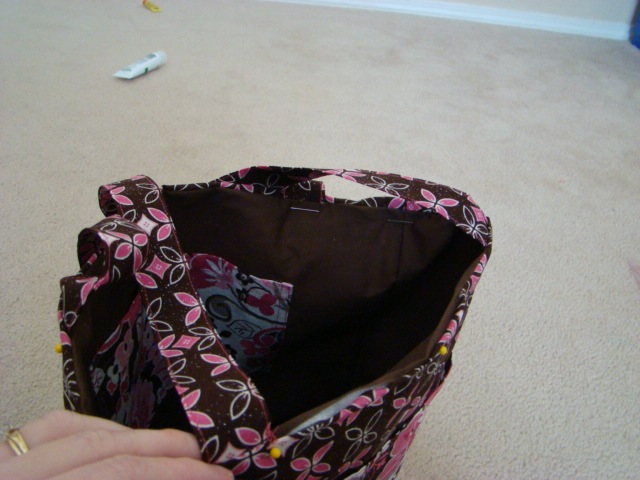
place the outside of the bag (fabric a) inside the lining of the bag (fabric c) right sides together. (the interfacing will be on the outside of the lining. make sure that both handles are not sticking out - the edges are pinned, but the handles themselves should be hanging down the side of fabric a (like above).

pin the top edges together. making sure the edges line up nicely. again - the raw edges of the handles should be pinned, but the handles themselves should not be seen at this point.

sew the edges together - leaving a 3-4" opening on one side - i usually leave the opening between two of the handles. stick your hand thru the hole and turn both sides right side out.

push the lining of the bag inside the outside of the bag, wrong sides together.
pin the top of the bag together - folding in the edges that weren't previously sewn. i like to try and make sure that the lining fabric (fabric c) can't be seen from the outside of the tote. because i'm weird that way.

sew a double seam around the top of the tote bag - making sure to get both fabric a and fabric c in the seam. i do the first seam 1/8" from the top and then the second seam is 1/4" from the top.

voila - you're done!! now you can see how cute the tote looks!

pair it with a matching scripture cover and you're good to go!!


You are ahhhhhhhhhh-mazing, chica! Have you considered selling these? I appreciate you teaching us how to do it and I would love my kids to have these, but I just cannot take on another project ... also I am just not that great of a seamstress, truth be told, and you are so awesome!
ReplyDelete